Indoor Worm Composting in a Small Bin: Preventing Odors and Pests
A worm bin under a utility-room shelf sounds like an easy way to turn vegetable peelings into something useful. Then a new owner notices condensation on the lid, a few flies near the kitchen, and scraps that have barely changed after a week. It is tempting to add more worms or more ventilation at random. Usually, the better answer is to treat the bin as a small living habitat whose moisture, food supply, air space, and temperature need to remain in balance.
Indoor vermicomposting uses composting worms and microorganisms to break down suitable organic materials. It does not work like a hot backyard compost pile, and it is not a disposal system for every kind of kitchen waste. This guide covers a manageable first bin, what to feed it, how to diagnose smells, and how to separate finished material without turning a small apartment into a workshop.
Decide whether a worm bin fits your home
A small indoor bin is useful if you generate modest amounts of raw fruit and vegetable scraps, can provide a protected place away from heat and direct sunlight, and are comfortable checking a living system regularly.
Start by estimating your scraps rather than buying a bin based on the size of your kitchen. Put suitable vegetable trimmings in a lidded container for several days and observe the quantity. A household that generates a little waste every few days needs a different setup from one cooking large vegetable meals daily.
Unlike conventional hot composting, a worm bin does not develop the sustained high temperatures used in properly managed hot piles. It should not be treated as a reliable way to destroy weed seeds, pathogens, or unsuitable pet waste. The University of Maryland Extension guide to indoor vermicomposting describes a cool, moist system based on redworms, bedding, and appropriate kitchen materials.
If your home has no space with acceptable temperatures or you cannot keep the bin secured from curious pets and children, community compost collection may be the more practical choice. A worm bin should simplify waste handling, not create a sanitation problem.
Choose composting worms rather than garden earthworms
The familiar earthworms that tunnel through garden soil are not interchangeable with red wigglers. Composting species such as Eisenia fetida live in decaying organic litter and are suited to shallow, food-rich environments. Soil-dwelling nightcrawlers may not survive confinement in a small tray of decomposing scraps.
Obtain worms from a reputable vermicomposting supplier or an established local bin. Check the identification rather than collecting random worms from a lawn. Some areas have restrictions or ecological concerns involving the transport and release of nonnative worms. Never release surplus purchased worms into natural areas; ask a local composting organization about responsible rehoming or disposal.
There is no universal requirement to buy the largest advertised starter population. A modest quantity can grow when conditions are suitable, while a heavily stocked bin can decline rapidly if oxygen, bedding, or food is poor. Match the starting population and feeding rate to the container and supplier’s instructions, then judge progress by the condition of the worms and scraps.
Healthy worms are responsive and seek the darker bedding when exposed to light. Repeated mass escapes, dead worms, or a strong sour odor deserve prompt investigation of the environment rather than immediate replacement of the population.
Select a container you can actually maintain
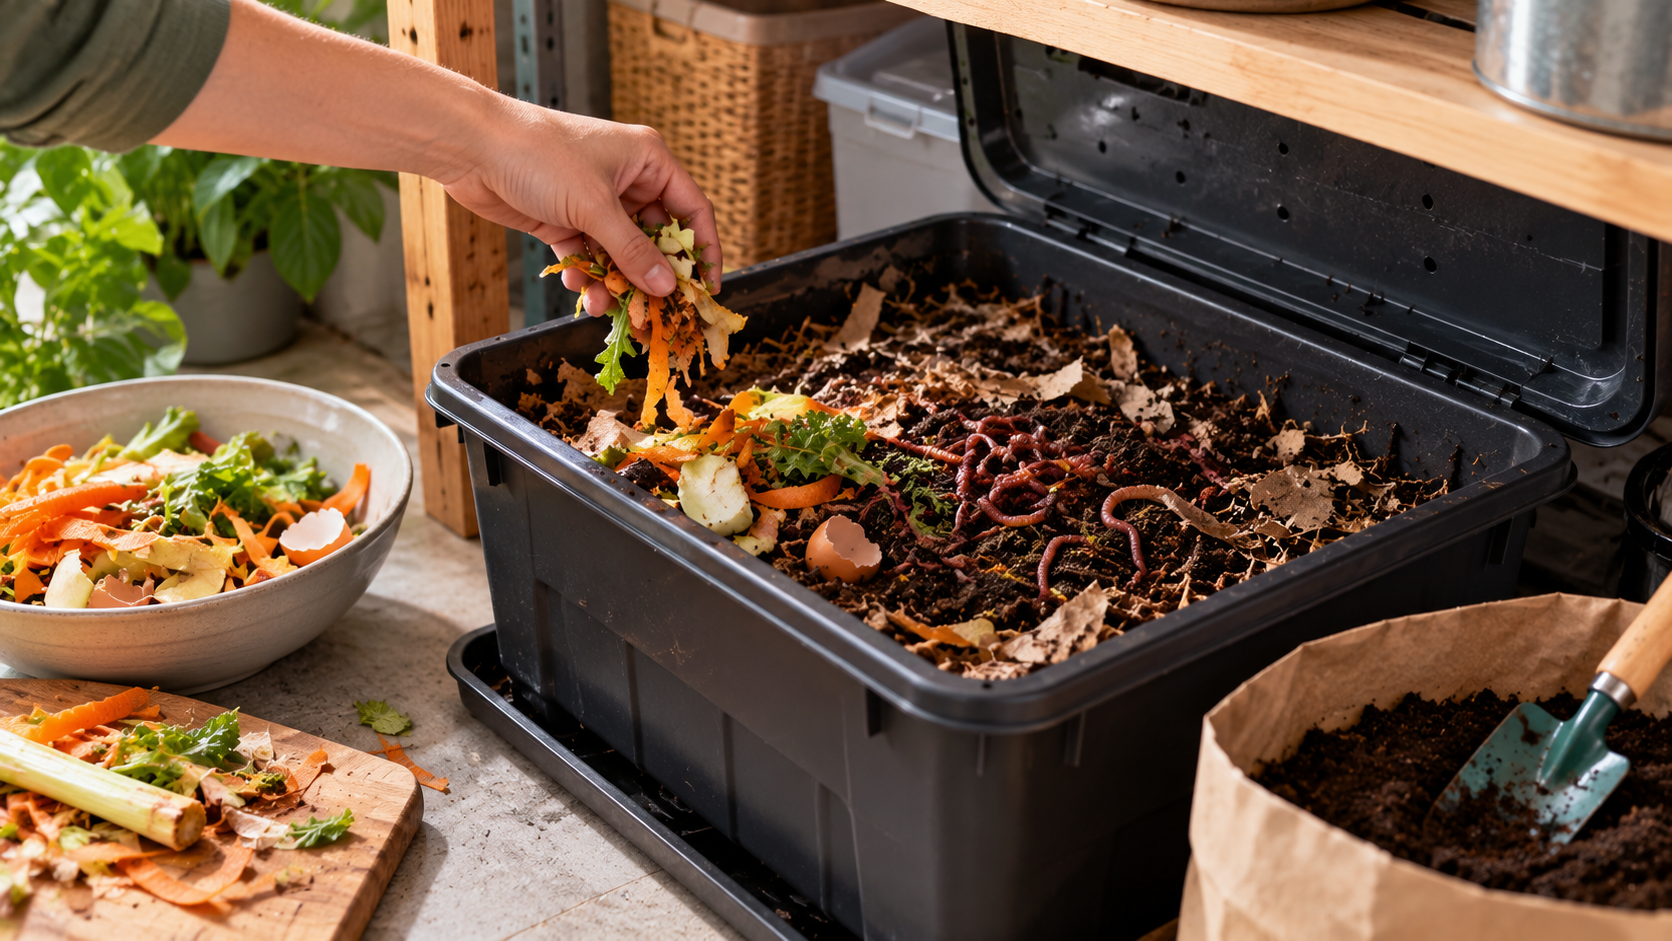
An opaque, relatively shallow storage box with a secure lid is easier to manage than a deep decorative barrel. It needs ventilation without allowing scraps, pets, or insects easy access. Manufacturer-made worm bins have different drainage and aeration arrangements; follow their design rather than copying hole sizes from an unrelated model.
For a simple do-it-yourself plastic container, safely made ventilation openings help prevent stagnant conditions. Place it on a protective tray where any accidental moisture can be seen and cleaned. Avoid placing the bin over food preparation surfaces or valuable furniture.
A deep layer of wet material can compact beneath its own weight and lose air spaces. Surface area is often more useful than depth because red wigglers feed near the decaying bedding. Leave headroom to add dry bedding when necessary and enough space to move material during inspection without spilling scraps on the floor.
Choose an accessible location: a shaded utility shelf, sheltered pantry, or suitable laundry area can work. Avoid hot windows, radiators, freezing garages, and the vibration of frequently used appliances. The Oregon State University Extension worm-bin guidance emphasizes a protected, ventilated location and careful moisture management.
Do not assume a tightly closed lid makes the bin more hygienic. If it traps excessive heat and condensation, the apparent neatness hides deteriorating conditions. Conversely, an uncovered box beside open fruit may encourage insects and drying. The goal is a controlled habitat, not an airtight container.
Prepare moist, breathable bedding before feeding
Bedding is not decorative packing. It provides moisture, air spaces, habitat, and a carbon-rich material that decomposers process. Shredded plain cardboard, suitable paper, and other clean, untreated materials are common options. Avoid glossy plastic-coated packaging, chemically treated scraps, or scented paper products whose composition is uncertain.
Moisten bedding with clean water, then squeeze a handful. It should feel like a damp sponge, not drip steadily or leave a puddle. Add it loosely so air remains between fibers. If bedding is already soggy, mix in dry shredded cardboard rather than spraying again because the top looks pale.
Introduce worms gently into prepared bedding and give them time to settle. They do not require an immediate banquet. A small first feeding tucked below the surface is enough to observe whether the system is working. Inspect without digging through every layer daily; frequent disturbance makes it harder to see a consistent trend.
The choice between coir, cardboard, and paper depends partly on cost and availability. If using coir, purchase material intended for horticultural use and be mindful of possible residual salts. A tiny bin does not need an elaborate proprietary bedding recipe. Consistent moisture and airflow matter more than buying every advertised additive.
Feed gradually and cover scraps with bedding
Add vegetable trimmings, small fruit scraps, modest amounts of used coffee grounds, and appropriate paper filters in quantities the worms and microbial community can process. Chopping larger pieces makes them easier to distribute and allows a faster breakdown. Food is first softened by microbial action, so scraps do not disappear as soon as worms are added.
Bury food beneath a layer of bedding and use a different feeding zone next time. This reduces exposed fermenting material that can attract fruit flies. Mark the area lightly or keep a short log so you know whether the previous batch remains. If recognizable food is still abundant, wait before adding more.
Keep out meat, fish, oils, dairy, pet feces, and heavily seasoned prepared food. Large amounts of citrus or onion can make a small habitat unbalanced. Never add chemicals or diseased materials expecting the worms to make them safe. The Oregon State guide gives practical examples of suitable and unsuitable ingredients, but the condition of your particular bin should still govern feeding.
Consider two apartments. In the first, a resident buries a handful of finely chopped peels twice a week, checking whether each pocket has begun breaking down. In the second, someone empties an entire weekend’s food-prep bucket onto the surface. The second bin may smell and breed flies, even with more worms. The difference is not a magic species of worm; it is the relationship between food load and the habitat’s capacity.
A simple feeding record can include date, approximate amount, type of scraps, visible leftovers, and whether the bedding feels too wet. After two or three weeks, the pattern becomes more valuable than any generic promise that a worm consumes a fixed fraction of its weight every day.
Diagnose moisture problems before adding more food
A good bin usually smells earthy or neutral when opened briefly. A sharp sour, rotten, or ammonia-like smell indicates that something is wrong. Check for pockets of decomposing food, compacted wet bedding, poor airflow, or an overloaded container. Remove obviously rotting excess material, add fresh breathable bedding as needed, and pause feeding.
If the bottom is saturated but the surface looks dry, misting the top will not fix it. Check whether drain openings are obstructed and whether accumulated liquid needs safe disposal. Do not mix dirty liquid into your houseplants merely because someone calls it ‘worm tea.’ Drainage leachate is not the same as deliberately prepared, finished vermicompost extract, and its safety is uncertain. It is particularly unsuitable for casual application to edible leaves or seedling trays.
If the bin is genuinely too dry, worms may retreat into the few moist pockets. Add water gradually to bedding rather than pouring a large volume over the scraps. Check again after moisture distributes through the material. An opaque lid reduces evaporation, but it should not eliminate airflow.
Temperature matters as well. A box next to an appliance can become uncomfortably warm without looking different from the outside. A cheap room thermometer placed nearby may reveal the problem. Cool conditions slow activity; excessive heat threatens worms and favors unpleasant decomposition. Move the bin to a more stable location before trying chemical treatments.
Keep fruit flies and other visitors from becoming established
Fruit flies often arrive with produce or are attracted to exposed scraps. Fungus gnats, springtails, and small mites may also appear, but they are not identical and do not demand identical responses. Look closely at the insects and at the stage of material in the bin before declaring an infestation.
For fruit flies, cover and bury new additions thoroughly, avoid overfeeding, and keep countertop scrap containers covered. Remove particularly attractive spoiled fruit rather than piling more bedding over a fermenting mass. Clean nearby surfaces and check household fruit bowls and drains, which may be separate breeding sites.
A sticky card near, not inside, the bin can help monitor some flying insects, but it will not resolve exposed food or overly wet conditions. Avoid routine insecticide spraying into the worm habitat; many products can harm beneficial organisms and may not be labeled for such use indoors. A persistent insect problem that cannot be controlled through sanitation may justify pausing the project and resetting the bedding.
Small white mites or springtails sometimes feed on decaying matter without substantially harming worms. A sudden explosion in numbers, however, can indicate very wet or heavily fed conditions. Correct the habitat first. Do not infer that every tiny moving speck is a dangerous household pest.
Harvest castings without dismantling the room
Finished vermicompost is a mixture of worm castings and decomposed bedding. It tends to be dark and crumbly, with an earthy scent. Visible fresh peels, large undecomposed paper fragments, or a sour smell suggest material is not uniformly finished. Harvesting can take months; expecting a full bag after the first two weeks leads to unnecessary disturbance.
For a small box, shift most feeding to one side and add fresh bedding on that side. Over time, many worms migrate toward the fresher food, allowing some older processed material to be removed from the opposite side. The migration is not perfect. Sort slowly and return worms and identifiable unprocessed scraps to the bin.
Another option is a small-scoop harvest of finished lower material while leaving the most active worms and bedding in place. Work on a washable surface and clean equipment afterward. Do not put composting tools on the same cutting board used for preparing meals.
The University of Maryland Extension guide describes several harvesting approaches and advises using vermicompost as a soil amendment rather than imagining it is a complete replacement for potting mix. For sensitive indoor pots, use moderate amounts and watch drainage and salt sensitivity. More castings are not always better.
Store reasonably dry finished material in a labeled suitable container away from edible food. Wash hands after handling worms, food waste, or compost, particularly before cooking. If material is intended for edible crops, follow local produce-safety recommendations and avoid applying unfinished material directly to harvestable surfaces.
A four-week example for a utility-room bin
Week one: Set up the container with moist, fluffed bedding. Introduce a reputable red-wiggler population, add a small covered feeding, and leave the habitat largely undisturbed. Record how the bedding feels and whether condensation collects under the lid.
Week two: Inspect the first feeding pocket before adding another. If much remains, wait. If the bedding feels too wet, add a little dry shredded cardboard and confirm airflow. Clean the kitchen collection container rather than leaving old juice in the bottom.
Week three: Compare the amount of visible scraps and the insects in the room with earlier observations. If fruit flies appear, investigate exposed peelings and other household sources. Avoid immediately buying pesticides or more worms. Adjust the feeding rate to actual breakdown.
Week four: The bin may be settling into a predictable rhythm, but finished material will usually be limited. Continue modest feeding and plan to harvest only when part of the contents has become consistently processed.
This calendar is an observation example, not a fixed feeding prescription. Winter temperatures, the initial worm population, bedding choice, and household waste load can make one bin much faster than another.
A realistic decision checklist
Before each feeding, ask whether there is still unprocessed food, whether the bedding holds moisture without dripping, and whether the smell remains neutral. Check that the location has not become unusually hot and that ventilation is unobstructed. If a condition is wrong, fix it before adding another handful of scraps.
When the bin seems slow, resist treating it as a machine that must meet a daily throughput quota. A modest, stable habitat can process food reliably for months. A large, wet pile with impressive equipment can fail in days. The useful skill is observation followed by one proportionate correction at a time.
Vermicomposting will not eliminate all household food waste, nor is the resulting material sterilized fertilizer. It is a manageable way to recycle appropriate scraps when the worms’ needs and household hygiene are respected. Begin small, build a feeding routine, and allow the decomposing community to establish before expecting regular harvests.
References
University of Maryland Extension — Indoor Worm Composting or Vermicomposting
Oregon State University Extension — Composting with Worms
Oregon State University Extension — Worm Castings Boost Soil Health With a Simple Home Bin