How Self-Watering Planters Work and When They Are a Poor Fit
A self-watering planter sounds like a container that knows when a plant needs water. In reality, most are passive systems with a reservoir, a way for water to move upward, and a growing medium that transports moisture through capillary action. They can make care easier, particularly for thirsty container plants, but they do not measure root health or prevent overwatering automatically.
Understanding the hardware is important before choosing a plant. The same reservoir that helps an actively growing herb avoid a dry weekend can leave a drought-tolerant houseplant persistently wet in winter. The goal is to match the system to the plant and your room—not to outsource observation entirely.
What is inside a self-watering planter?
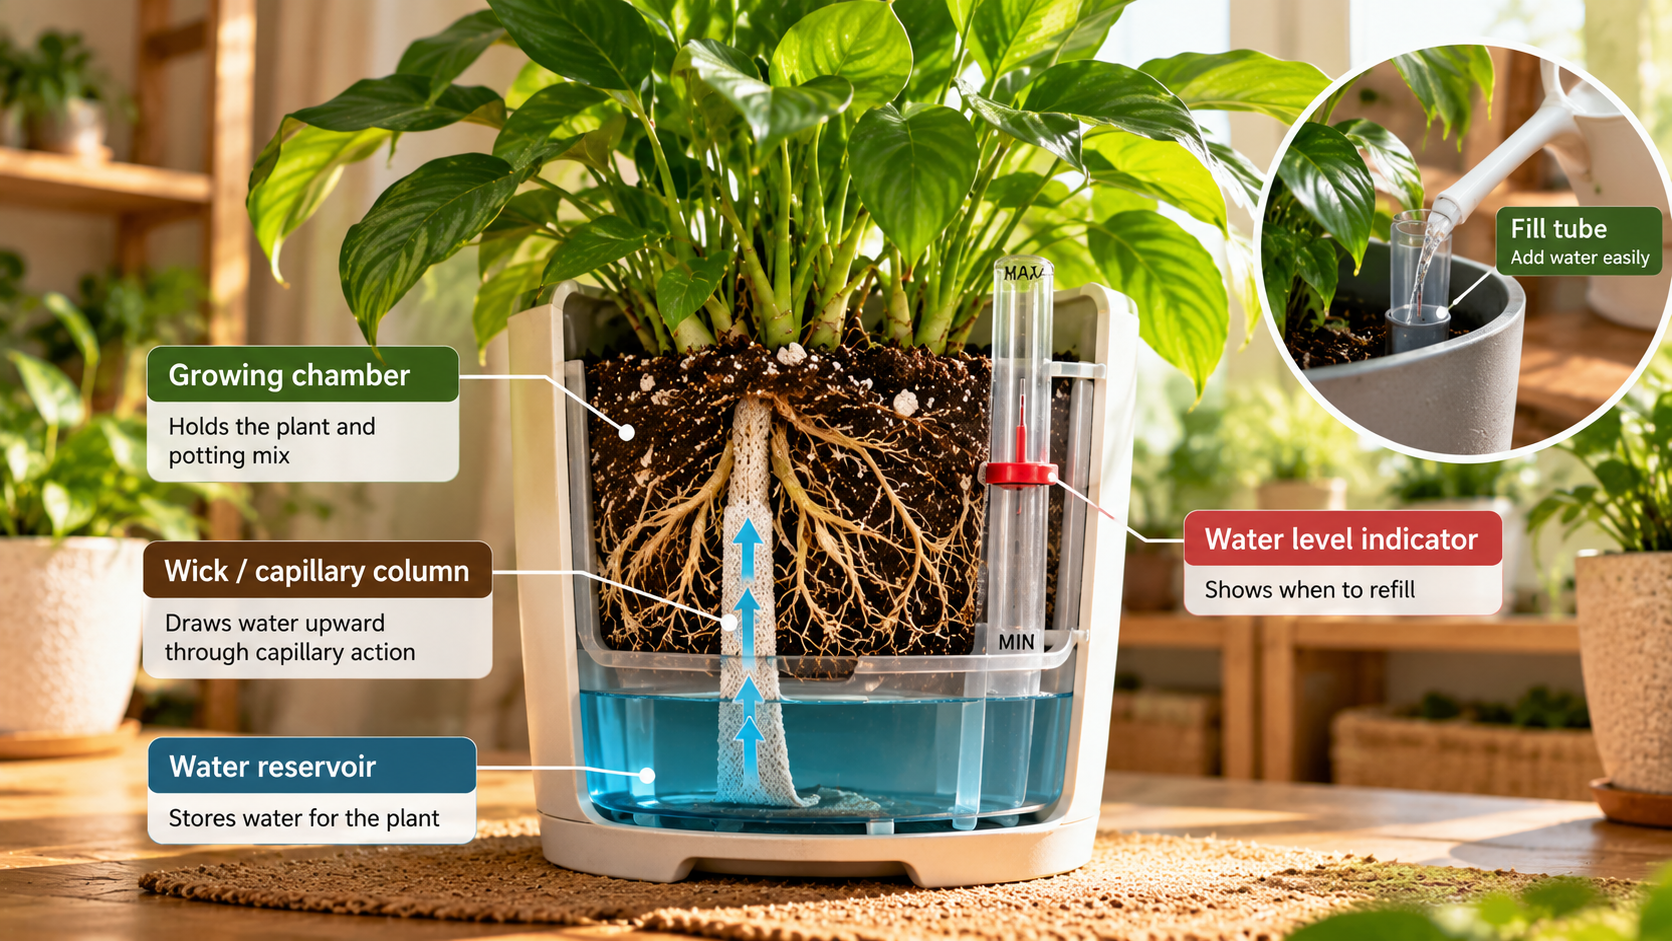
Most designs separate a growing chamber from a reservoir below. A wick, absorbent column of medium, or other capillary pathway draws water upward. Some have a fill tube, a float gauge, and an overflow port. Others use a simple inner pot that dips into water at one point. These distinctions matter because they determine where roots can grow, how much water is stored, and whether excess water has somewhere to escape.
Capillary action moves water through connected small spaces in a moist material. It does not force water evenly through any mixture regardless of particle size. Very coarse bark may conduct water differently from fine coir or peat, and a dried-out medium can sometimes resist rewetting. A reservoir can be full while upper roots remain too dry if the wick is disconnected or the medium does not transmit moisture effectively.
An overflow hole can limit water depth when a container is filled correctly, but not all systems include one. Read the manufacturer’s instructions rather than assuming the reservoir will safely spill excess water outdoors or into a sink. If there is no practical drainage route, the planter may be difficult to flush after fertilizer salts accumulate.
A simple way to test the mechanism
Before planting, fill the reservoir according to its instructions and observe whether a pre-moistened sample of the intended medium gradually becomes damp above the wick. Check at more than one depth. Do not declare the planter defective after only a few minutes; capillary behavior takes time and differs between materials. Equally, do not assume the top surface must become visibly wet. What matters is whether the active root zone can access suitable moisture.
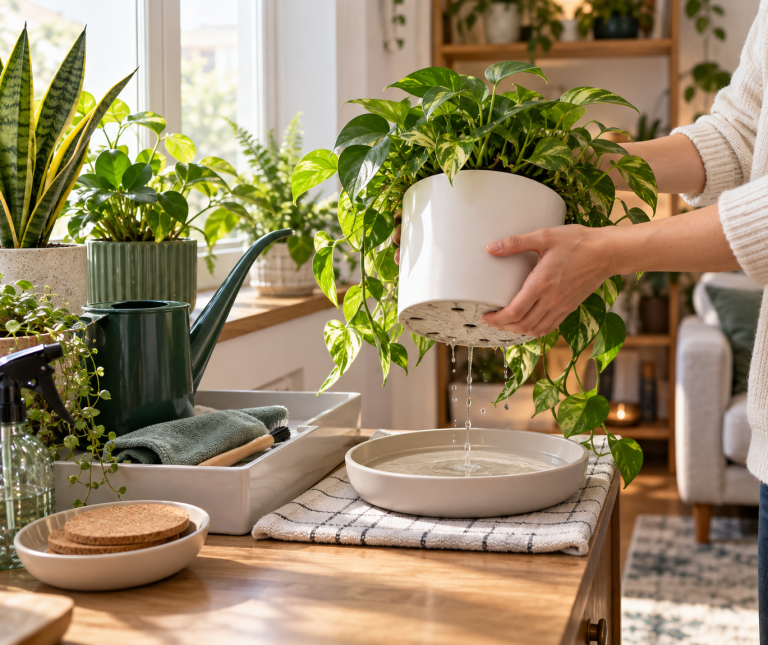
Lift the inner pot, when the design allows, and note the water-contact area. Inspect for a wick that has slipped loose or accumulated debris. Familiarizing yourself with the mechanism makes later troubleshooting more precise than relying on a plastic “empty/full” gauge alone.
Which plants may benefit?
Fast-growing edible herbs, leafy greens, and some moisture-loving tropical foliage can benefit when the reservoir helps reduce abrupt drying in small containers. A plant on a sunny balcony may use water quickly enough that a reservoir provides practical buffering. A small collection in an apartment also benefits when you can refill several planters without lifting heavy pots over furniture.
That does not make self-watering pots universally superior. Cacti, many succulents, and species that require substantial dry-down between waterings may be poor fits for a system that maintains steady moisture. A dormant plant in low light may use much less water than it did during summer, allowing the reservoir to remain nearly full for an extended period. Even a plant that normally appreciates moisture can suffer if roots are confined in a saturated, poorly aerated medium.
Container size changes the calculation. A very young plant with a small root ball in a large reservoir planter may not use stored water promptly. A mature plant with extensive roots may empty the same reservoir quickly. Evaluate the relationship between roots, medium, evaporation, and seasonal growth instead of choosing solely by plant label.
The hidden tradeoff: water versus oxygen
Roots need oxygen as well as water. A good self-watering design maintains adequate air spaces while making moisture available where roots can reach it. If the growing chamber remains uniformly saturated, respiration and root function may decline. That can produce wilting even when a reservoir is full: damaged roots are poor at supplying water to foliage.
Check the texture of the medium and how much of it remains wet near the bottom. An appropriate mix should transmit some moisture while retaining enough structural pore space. Dense garden soil or decomposed fine organic matter may be a poor choice, particularly when the reservoir and root zone are closely connected. At the other extreme, a mix composed almost entirely of large bark chunks may fail to wick effectively.
The RootLuma root-rot guide explains why root decline cannot be diagnosed from a watering schedule alone. With reservoir planters, evaluate the full system before responding to a drooping plant by filling the reservoir higher than intended.
How to set one up carefully
Start by choosing a model whose reservoir is accessible and whose water level can be inspected. Wash components before first use. Assemble the wick or capillary insert exactly as directed and add a compatible growing medium. Pre-moisten dry coir or peat-based ingredients if their instructions require it; expecting a fully dry medium to start wicking instantly can cause uneven hydration.
Plant at the appropriate depth and do not pack medium tightly around a delicate crown. Many systems recommend watering from above initially while roots establish and the capillary connection becomes reliable. Follow the model’s directions. Once established, test whether water is reaching the root zone before leaving the plant unattended for a long trip.
Keep the fill opening and surrounding tray clean. Standing water exposed to light can encourage algae, and inaccessible reservoirs can accumulate residue. For edible crops, use clean water and materials suitable for food-growing applications. A self-watering system does not eliminate ordinary hygiene or food-safety considerations.
Do not refill simply because the gauge moves
A water-level indicator shows reservoir volume, not plant thirst. Before topping up, check the mix and the plant’s condition. Some models work better with a brief interval when the reservoir is empty; others are designed for a different pattern. Follow product guidance and the needs of the species. The right routine may change when daylight and temperature decline.
A permanently full reservoir can conceal excess moisture. Conversely, a gauge stuck at empty may indicate a mechanical problem or a disconnected float. Test the gauge independently if its reading conflicts with the weight of the unit or visible water level.
Compare a reservoir pot with ordinary drainage
Feature Self-watering planter Conventional draining pot
Water delivery Capillary movement from stored water Periodic watering from above or below
Main advantage Buffers some drying between care sessions Direct control over watering and drainage
Main risk Excess persistent moisture or failed wicking Missed watering or runoff management
Monitoring Check reservoir and root-zone moisture Check medium and drainage after watering
Best match Appropriate species with predictable water demand Broad range of plants when watered thoughtfully
Neither option is automatically more sustainable or cheaper. A poorly matched reservoir may waste plants and materials, while ordinary pots may need more frequent care. Choose based on the species, home environment, and how reliably you can observe the system.
Troubleshooting a planter that performs badly
The reservoir is full but the upper mix is dry. Inspect wick contact, medium texture, and whether the initial material was properly moistened. Do not immediately add another larger reservoir. You may need to re-establish capillary contact or change to a compatible mix.
The pot smells sour and leaves droop. Investigate root oxygen, stale water, and the moisture content of the lower chamber. Empty the reservoir if necessary and inspect roots when decline warrants it. Do not treat a full reservoir as proof the plant is hydrated correctly.
Algae grows in the fill tube. Clean accessible components according to manufacturer guidance and reduce exposure of stored water to light where possible. Avoid pouring unapproved chemicals into a planted reservoir.
Fertilizer residue builds up. Review whether the design allows safe flushing, and follow suitable fertilizer concentration guidance. A reservoir can concentrate salts over time as plants take up water and evaporation occurs.
The plant thrives in summer but struggles in winter. Water use changes. Reduce refilling as appropriate, consider a conventional draining pot for species that need a distinct dry period, and ensure enough light for healthy growth.
A useful trial before converting the whole collection
Test one appropriate plant for several weeks. Record reservoir refill dates, moisture below the surface, and how leaves respond. Compare it with an otherwise similar plant in a normal draining pot only if the light, root mass, and medium are reasonably comparable. You are not conducting a controlled laboratory experiment, but you can discover whether a particular planter helps your routine.
If the trial plant develops steady new growth, predictable moisture, and no sour smell or root decline, the model may be suitable for another plant with similar needs. If it stays wet too long, change the system rather than blaming yourself for “using self-watering wrong.” Sometimes a different planter or a conventional pot is the better match.
The RootLuma repotting guide is relevant when converting plants between systems. Choose container size based on the root system and avoid combining transplant stress with sudden changes in light and feeding.
Understand the reservoir as an evolving system
A planter can behave differently after several months than it did on planting day. Roots may grow through openings into the reservoir, organic particles may settle, and mineral deposits may accumulate around the wick or fill tube. The water indicator itself can stick. A well-designed maintenance routine therefore includes occasional inspection of parts you cannot see from above the pot.
When the plant is healthy, do not dismantle the unit unnecessarily. Instead, check the reservoir during ordinary refills and note whether moisture still reaches the root zone predictably. If water sits stagnant or the capillary connection fails, clean and service the system according to its instructions. A heavily root-bound specimen may need repotting or a larger appropriate container, but a new reservoir is not automatically a cure for every decline.
Consider pests and household access
Reservoir openings can collect debris and sometimes allow insects to access standing water, depending on the design and location. Keep fill ports covered as intended, clean deposits, and avoid exposed stagnant water. In homes with small children or pets, choose a unit that cannot be easily tipped or opened. A full container may weigh substantially more than it does empty, which affects shelf loading and moving safety.
For edible plants, cleanliness matters because water, hands, and tools can introduce contaminants. A reservoir may reduce routine top watering but does not sanitize itself. Use water and materials suitable for food crops and follow the manufacturer’s maintenance recommendations.
Budget for failure modes, not only convenience
The value of a self-watering planter depends on whether it reduces a real problem in your routine. If you travel frequently and grow a thirsty herb, it may be worthwhile. If you grow a drought-adapted succulent under limited winter light, the same reservoir may create more checking and root-risk than a conventional pot. Compare reliability, serviceability, and replacement parts before buying several identical units for unrelated plants.
The first two weeks with a reservoir planter
On day one, verify the overflow path, fill instructions, and whether your particular substrate can move water upward effectively. Start with a plant whose moisture preference suits a reservoir system; do not assume a bark-grown epiphyte and a moisture-demanding leafy plant should be treated identically.
During the first week, inspect moisture at root depth as well as the water-level indicator. Watch for wilting while the reservoir still contains water: that may mean the wick is not functioning, the upper medium is too dry, or roots have not reached the wetted area. Equally, a constantly soggy medium can indicate inadequate air space despite the convenience of automatic supply.
In the second week, review the rate of reservoir use and the plant’s response. Only then decide whether topping up before a short trip is sensible. A full tank is not a guarantee against root stress, and the correct refill interval depends on the actual plant and room.
The practical verdict
Self-watering planters are tools for managing water supply, not automated plant doctors. They are most useful when the reservoir, medium, root system, and plant’s actual water demand work together. Inspect the components, test wicking, and keep monitoring the root zone. When a plant requires dry intervals or the room keeps the mix wet for days, choosing a normal draining pot can be the more intelligent option.
References
University of Maryland Extension — Self watering containers
University of Maryland Extension — Growing vegetables containers and salad tables