How to Inspect Houseplant Leaves for Pests With a Hand Lens
You can inspect a houseplant every week and still miss the organisms that matter. Mealybugs may sit in leaf axils, spider mites may be almost invisible on the undersides, and scale insects can resemble ordinary stem texture. A simple hand lens does not turn you into a laboratory diagnostician, but it can turn a vague suspicion into an observation you can photograph, record, and investigate responsibly.
The purpose is not to identify every microscopic speck to species. It is to separate living pests from residue, locate the affected plant parts, recognize the pattern of damage, and know when a question deserves expert help. A consistent five- or ten-minute inspection can prevent a small issue from becoming a collection-wide problem.
Choose a lens you can actually use
A basic hand lens of moderate magnification is often sufficient for visible insects and damage details. Extremely high magnification sounds impressive but can have a narrow field of view, require close focusing, and make a moving target hard to follow. A clear, well-lit view is more useful than a large advertised number with poor optical quality.
Good lighting changes the result. Use bright diffused daylight or a small adjustable lamp so you can direct illumination across leaf surfaces without overheating them. A flashlight held at a shallow angle can reveal webbing, raised bumps, or residue that disappears under flat overhead light. Keep the lens clean and avoid touching it to leaves recently treated with sprays.
If you use a clip-on phone macro lens, practice on an ordinary leaf first. Phone cameras may automatically change focus or processing, creating an attractive but misleading image. Hold the camera steady, photograph one small section at a time, and include a wider photo so you remember where the detail came from. A close-up of one unidentified dot without context can be difficult for anyone else to interpret.
Develop a repeatable inspection route
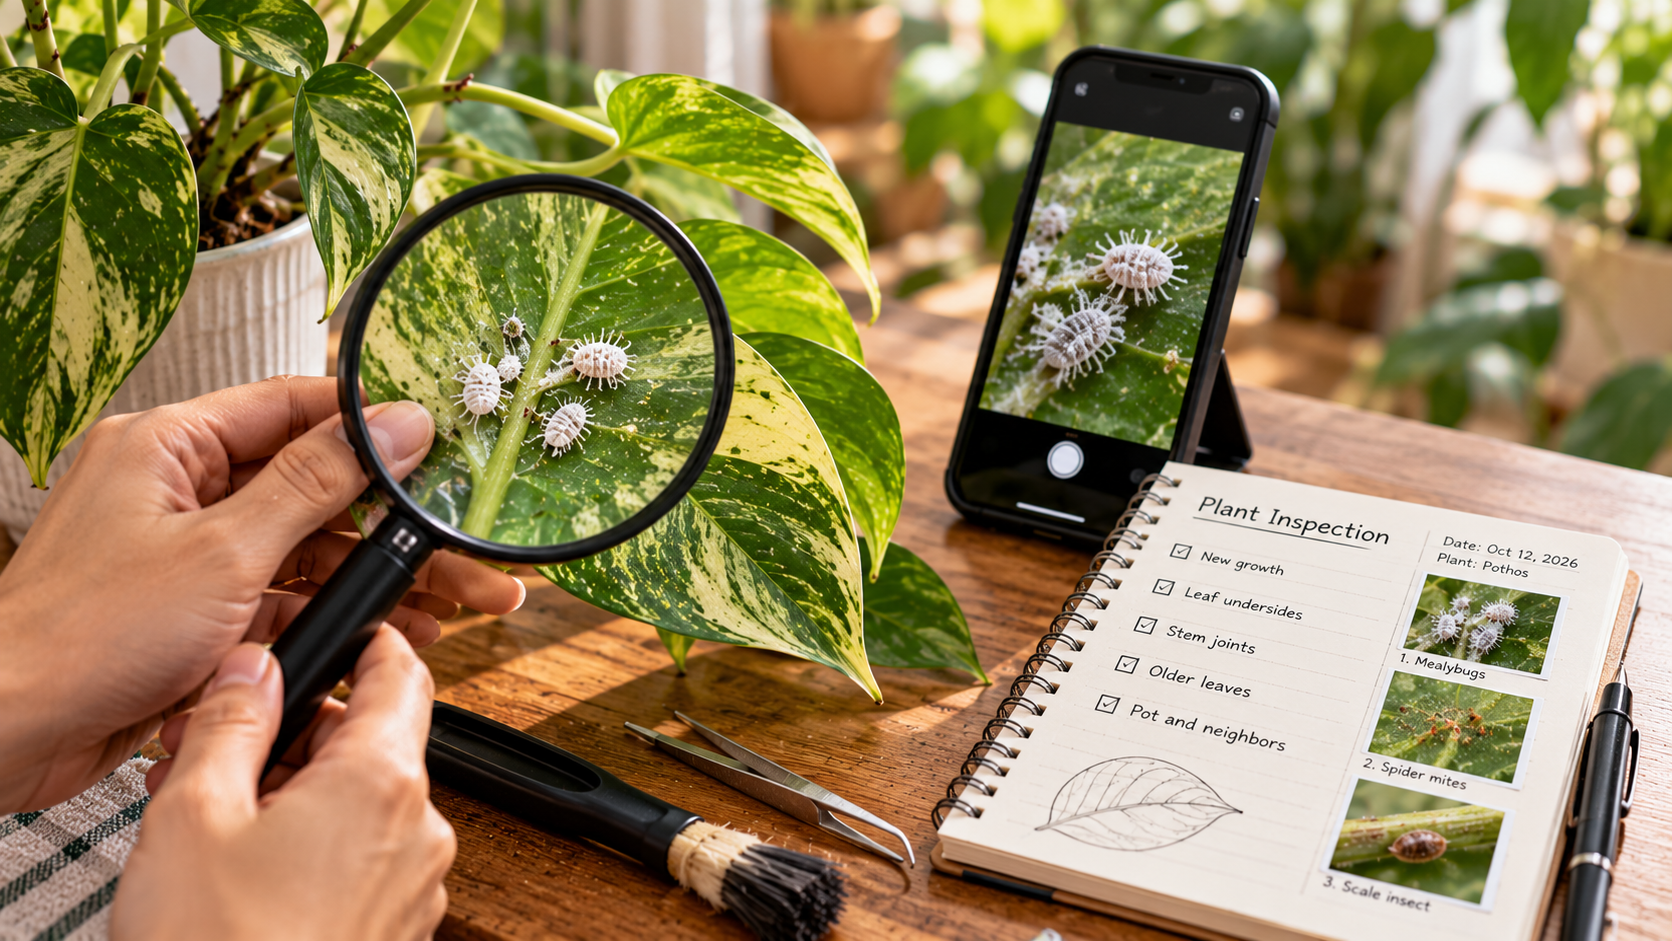
Begin with the newest growing points, then follow each branch toward older leaves. Inspect where leaves join stems, the underside near the main vein, and narrow creases that collect debris. Examine damaged and apparently healthy leaves. If you only investigate the leaf with the biggest stain, you may miss the living insects feeding elsewhere.
Lift leaves gently rather than folding them backward sharply. On a large monstera, support the blade with one hand while looking along its veins. On a compact rosette, use light and the angle of view rather than pulling the crown apart. On fuzzy leaves, avoid rubbing away trichomes that belong to the plant. Treat the plant as living tissue, not an object you can disassemble for a better photograph.
After the leaves, inspect petioles, nodes, flowers, the rim of the pot, and accessible roots or medium surface when relevant. Some pests do not stay in one predictable place. Mealybugs can occupy stem joints, while fungus gnat adults hover near wet medium. The inspection should follow the most plausible pest rather than forcing every problem through exactly the same checklist.
A five-zone map
New growth: unfolding leaves, buds, and tender stems where feeding may distort tissue.
Leaf undersides: veins, midribs, and protected surfaces where mites or scale may occur.
Stem joints: narrow axils that shelter waxy colonies or eggs.
Older foliage: accumulated feeding marks and the difference between old and new injury.
Pot and neighbors: rim, media, touching foliage, and the nearest plants that could share pests.
Photograph one representative area from each affected zone. Recording location is more informative than a photo folder full of unlabelled leaf close-ups. Over time you can see whether the problem stays localized or moves.
Match clues to plausible pests
White cottony clusters: Look for individual oval bodies under the wax, especially at leaf axils. Mealybugs may also create honeydew. Dust and ordinary leaf hairs do not usually form living clusters in the same way.
Fine stippling and tiny moving dots: Use a white-paper tap test below the affected leaf to look for mites. Spider mite webbing may be very delicate and absent early. Do not mistake ordinary spiders living near the pot for sap-feeding mites without a closer check.
Rounded bumps attached to stems or veins: Scale insects are possible, but natural corking and scars may resemble them. Inspect distribution and surface details before scraping anything away.
Silvery streaks or black specks on foliage: Thrips or other issues may be involved. Look for living insects and characteristic damage rather than treating one sign as definitive.
Sticky leaves: Honeydew can suggest sap feeders, but it does not establish which species. The source may be above the sticky leaf rather than on it.
These patterns narrow possibilities. They do not replace expert identification when pesticide selection depends on precise diagnosis. If the plant is valuable or symptoms are severe, ask a local extension service to review clear photographs.
Document without turning the hobby into paperwork
Create a note with the plant’s name, date, suspected issue, affected zones, and one or two photographs. Add whether insects are alive, whether new damage has appeared, and which action you took. Use the same labels at each check: “none observed,” “one localized colony,” “several areas,” or “widespread.” These categories may be more practical than trying to count hundreds of tiny organisms.
Record relevant context: a new plant added last week, a moved shelf, or a recent leaf spray. The sequence of events helps you test explanations. A record showing new damage before a fertilizer application suggests the fertilizer is not the original cause, even if it later creates another issue.
The RootLuma quarantine guide explains how to observe newly acquired plants separately. Hand-lens checks can fit into that routine, but do not mistake a fixed calendar quarantine period for proof a plant is pest-free; life cycles, temperature, and detection vary.
Photograph useful evidence
Include a wide shot to show distribution, a close-up with sufficient scale or a familiar object for context, and a second close-up of the suspected living insect. Avoid touching the organism with a ruler or coin if that would injure delicate tissue. Note whether a tiny dot moved; a still image cannot convey movement without your observation.
If you send photos for help, explain which side of the leaf is shown and whether the plant has been treated. The same white residue may look different after wiping or spraying. Accurate context lets an expert distinguish insect wax from environmental deposits more reliably.
What to do when you confirm a pest
First separate the affected plant if practical and check nearby plants. Then choose a response that suits the organism and severity. A few accessible mealybugs may be removed manually; mites may require attention to undersides and a different control approach. Some life stages are shielded from contact products. A precise identification changes what “effective coverage” means.
Do not spray alcohol, neem oil, soap, or household disinfectant simply because the lens reveals a living insect. Whether a control is appropriate depends on the pest, host plant, product labeling, and local regulations. The RootLuma leaf-cleaning guide is useful for gentle handling, but routine cleaning should not be confused with pest-specific treatment.
Maintain the same inspection route after treatment so you can measure the trend. Old stippling, scars, or black sooty residue may remain even when feeding stops. Look for fresh insects and new damage on developing tissue instead of expecting a completely unmarked leaf the next morning.
Avoid false alarms and missed problems
A close lens can make ordinary plant features look alarming. Leaf hairs, resin glands, tiny mineral crystals, and harmless surface dust may appear dramatic at magnification. Compare healthy and affected areas of the same plant, and examine another specimen of the same species when available. Avoid scraping, pruning, or spraying until you have evidence that the feature is not normal.
The opposite mistake is dismissing a confirmed cluster because the plant is still attractive. Small early populations are often easier to address than dense infestations. If the lens reveals active mealybugs or moving mites and the pattern continues across several checks, do not wait for severe wilt to make a plan.
Use a clean cloth to wipe the lens between plants if it contacts surfaces, and wash hands after handling suspected pests. Avoid carrying contaminated plant debris from one shelf to another. Simple hygiene is enough; there is no need to disinfect an entire room after seeing a single insect.
A practical inspection schedule
Situation Focus What to record
New plant arrives Leaf undersides, axils, pot rim Any living organisms or suspicious residue
Weekly routine Two or three representative leaves per plant Changes from its previous condition
One plant becomes symptomatic Full five-zone check Which tissues are affected and whether pests are confirmed
After pest removal Previously positive areas and neighbors Live insects, new damage, and treatment tolerance
Before propagation or gifting Source stem, nodes, roots when relevant Whether the material appears healthy and pest-free
The schedule can be adjusted to a collection’s size and risk. It is not a claim that a once-weekly check guarantees early detection. Consistency helps reveal change; careful observation determines the response.
Establish what normal plant anatomy looks like
Magnification is useful only when you know what you are comparing. Many plants have trichomes, small nectar glands, lenticels, or natural scars that appear surprisingly insectlike up close. Start each new species by examining an unaffected leaf and a healthy stem in good light. Note the distribution of its ordinary features. Then a new cluster of moving insects or fresh feeding marks becomes easier to recognize.
Some plants also produce sticky secretions naturally or after minor damage. Other surfaces collect mineral spots from overhead watering. Neither means that scale or mealybugs are necessarily present. The lens should encourage you to ask whether a feature belongs to the plant rather than treating every irregularity as a pest.
Keep your notes useful for professional identification
If you need expert help, supply a clear whole-plant photograph, the botanical name if known, a close-up of the suspected organism, and a short history. Mention whether it moves, where it appears, and when damage started. Do not send only a blurred image of a white dot. With the plant’s growing conditions and symptom timeline, an extension specialist can often narrow possibilities or tell you what additional sample would be useful.
A safer response to uncertain identification
If the plant remains vigorous and you cannot confirm damaging organisms, monitoring may be a better first step than treatment. Separate it temporarily if there is a credible spread risk, but preserve suitable light and normal watering. A few days of structured observation can reveal movement, new colonies, or a recurring symptom pattern. A measured delay is not neglect; it can prevent avoidable phytotoxicity from a treatment aimed at the wrong target.
What a hand lens cannot do
It cannot prove that a plant is free of eggs hidden in tissue, identify every pathogen, or establish exact pesticide susceptibility. Some problems require microscopy beyond a hand lens, laboratory work, or regional diagnostic expertise. Make decisions proportionate to the evidence you actually have, and seek help if a valuable plant continues to decline despite the absence of visible pests.
Frequently asked questions
How much magnification is enough? A modest high-quality hand lens is useful for common visible pests. Choose clear optics and comfortable focusing rather than chasing an extreme number.
Can I identify a species from a phone photo? Sometimes, but many organisms need specialized characteristics or expert examination. Describe observations honestly if identification remains uncertain.
Should I treat every insect on a plant? No. Some are harmless visitors or beneficial organisms. Identify the role and actual damage before intervening.
Will my lens show fungus gnat larvae? It may help examine visible larvae in damp media, but digging extensively through healthy roots is unnecessary for a minor flying-insect problem.
What if I find no pests? Reconsider environmental causes, inspect again if symptoms progress, and seek expert advice for severe unexplained decline rather than treating a guess.
Small tools, better decisions
A hand lens is valuable because it slows the decision down just enough to make it precise. Search the right plant surfaces, record living organisms and fresh damage, and revisit the same spots. Once you know whether you are looking at a pest, a residue, or ordinary plant anatomy, the next action becomes easier—and much less likely to harm an otherwise healthy houseplant.
References
University of Maryland Extension — Diagnose indoor plant problems
University of Minnesota Extension — Insects on indoor plants