Spider Mites on Houseplants: Spot Stippling and Webbing Early
Spider mite damage can begin long before a plant looks infested. A favorite leaf develops a dull, speckled appearance; the green seems to fade into hundreds of pinpricks. You may blame hard water, sun, or ordinary aging because the insects themselves are almost invisible without magnification. By the time silky webbing connects leaves and stems, the colony may be well established.
These tiny relatives of spiders feed by puncturing plant cells, leaving characteristic pale stippling. Their populations can increase quickly in favorable warm, dry conditions, particularly when plants remain undisturbed near bright windows or heat sources. The task is not simply to wipe away a web. It is to confirm living mites, reduce the population without injuring the plant, and check whether new feeding damage stops.
Recognize damage before webbing becomes obvious
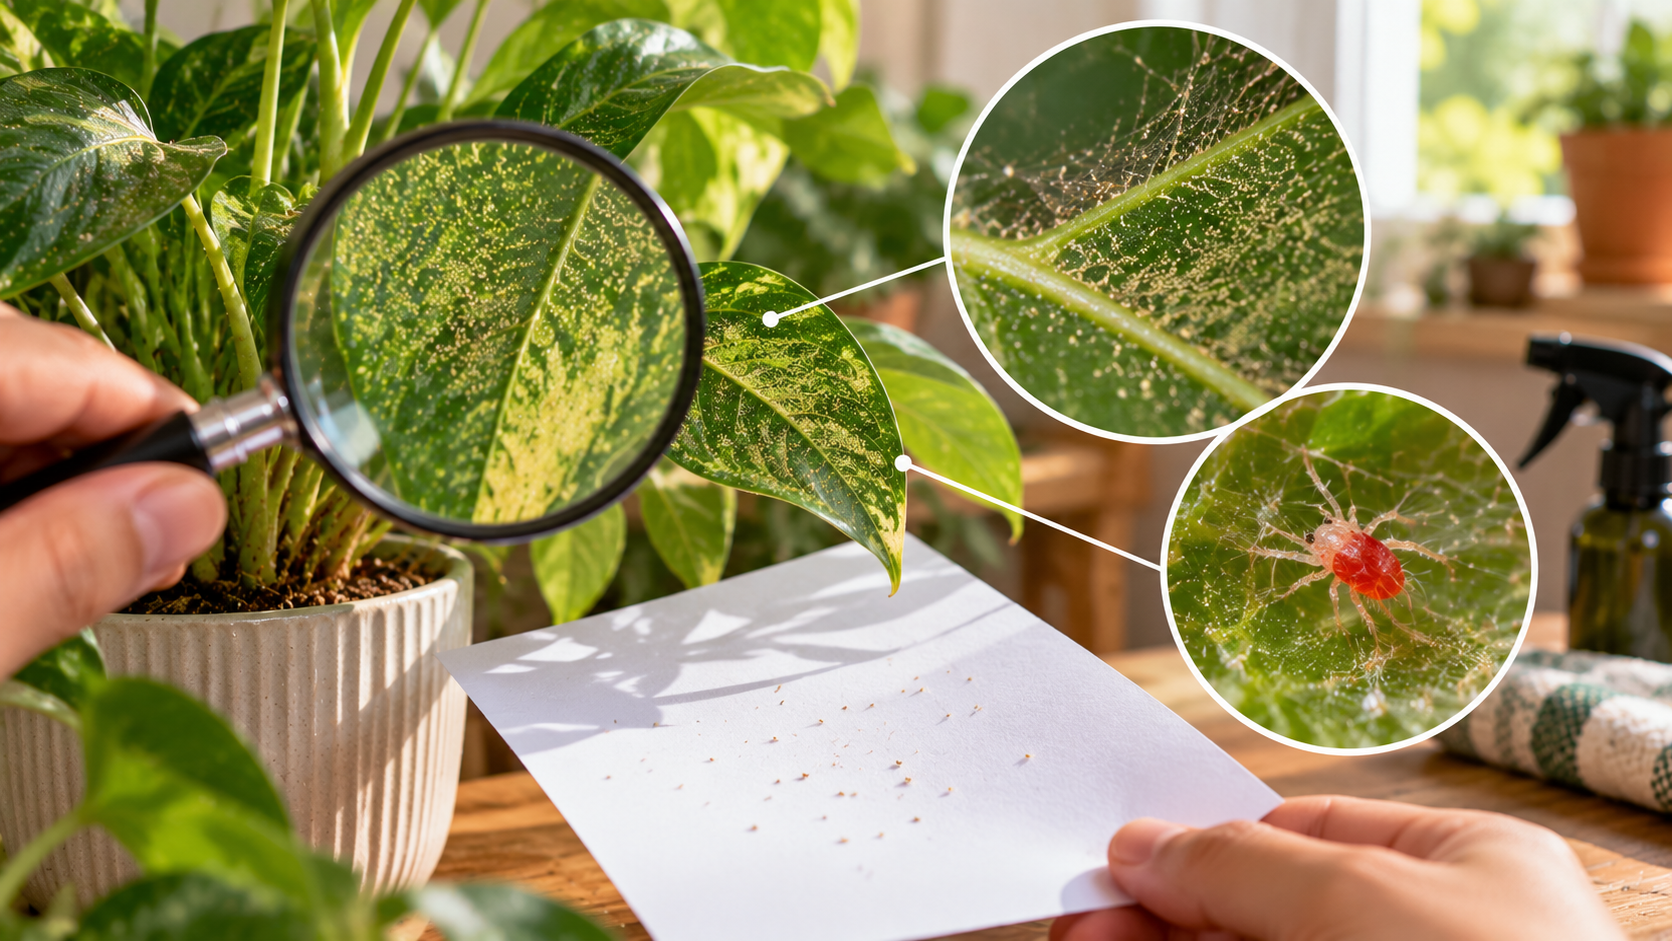
Early spider mite injury usually appears as numerous tiny pale dots or a faint bronzed cast, often first visible on leaves that receive consistent light. Instead of a clean brown margin, damage looks scattered across the blade. Extensive feeding can lead to yellowing, drying, or premature leaf drop. On variegated plants, stippling may be harder to notice because natural pale areas interrupt the pattern.
Fine webbing can support a diagnosis but does not always appear at the beginning. Ordinary spiders may also build webs near a plant without feeding on its leaves. Conversely, a plant can harbor substantial mites without the dramatic cobwebs shown in online photographs. Look for the combination of leaf stippling, tiny moving points on undersides, and fresh damage on previously healthy tissue.
Inspect several leaves rather than relying on the worst-looking one. Newer leaves may still be clean while older leaves bear accumulated damage. Turn each leaf toward bright indirect light and compare both surfaces. You may find mites clustered along the main vein and at the place where the leaf joins the petiole. A hand lens, even an inexpensive one, is often more useful than trying to photograph a moving speck with a standard phone camera.
Use the white-paper tap test
Hold a sheet of plain white paper under a suspicious leaf. Tap the leaf gently a few times and examine the paper under strong light or with magnification. Tiny dots that move independently may be mites. Pollen, dust, and soil particles do not walk. This test helps identify activity, but it is not a perfect species identification: other tiny arthropods can also fall onto the paper.
Repeat on a different leaf, then compare with an apparently clean plant nearby. Do not pound the leaf or shake an already stressed plant. If you cannot confirm mites and the damage pattern differs from stippling, reconsider the diagnosis. Thrips, some nutrient problems, sunscald, and ordinary leaf aging can produce marks that are superficially similar. Treating the wrong cause wastes time and may add leaf injury.
Understand the conditions that favor outbreaks
Warm interiors with low relative humidity can encourage outbreaks of certain common spider mites, but humidity alone does not determine whether a plant becomes infested. Mites may arrive on new plants, cuttings, or infested material. Once established, crowded leaves and difficult-to-reach undersides allow populations to remain unseen. Plants next to forced-air heating may be under additional water stress even when the room’s average temperature seems reasonable.
Do not attempt to control mites by keeping foliage continuously wet. Many indoor plants dislike water held in crowns or on fuzzy leaf surfaces, and high room humidity can bring condensation problems. A pest response should not compromise the home’s comfort or the species’ normal care. Instead, correct severe plant water stress, move the affected plant away from direct heat if suitable, and choose mechanical or labeled treatments based on evidence.
The RootLuma plant quarantine guide offers a practical starting point for managing new introductions. Isolating a confirmed infested plant also makes it easier to inspect neighbors and reduces leaf-to-leaf contact while you work. Avoid carrying detached infested leaves through other plant clusters without containing the material.
Reduce the population without damaging foliage
For robust, smooth-leaved plants, a carefully directed rinse can remove some mites and webbing, especially from undersides. Support branches and use water pressure gentle enough not to tear tissue. Allow the plant to drain and dry under suitable indoor conditions. Water removal works best as one component of an ongoing plan, not as a guarantee that every egg and hidden mite is gone.
For large leaves, a soft damp cloth can help lift residues and mites where access is good. Do not rub hairy leaves aggressively or use oily leaf-shine products. The technique described in RootLuma’s leaf-cleaning guide can support safe handling, but a diagnosed mite outbreak requires repeated pest checks beyond ordinary dust removal.
If the population persists, investigate insecticidal soaps, horticultural oils, or products specifically labeled for the mite and indoor ornamental use in your location. Mites are not insects, and not every general insecticide is effective against them. Some broad-spectrum products can disrupt natural enemies or worsen a mite problem in outdoor settings; choosing a product solely because it says “bug killer” is a poor strategy. Read the complete label for plant sensitivity, concentration, protective measures, application interval, and indoor restrictions.
Test a small area if label guidance permits, particularly on sensitive tropical foliage. Avoid spraying an oil product during strong sun exposure or on a plant already wilting from heat. Never combine multiple products or raise concentrations in an attempt to accelerate control. Repeated coverage of leaf undersides, at the timing specified on the label, may be more important than applying a stronger solution once.
Measure progress on new tissue, not old scars
Stippled leaves will not become uniformly green again after successful treatment. The punctured cells remain altered. Judge progress by the absence of tiny moving mites on repeated checks, less fresh webbing, and healthy newly expanding leaves. Photos taken from the same angle and in the same light are helpful because different lighting can make old stippling appear better or worse without a biological change.
Build a monitoring route that begins with the worst affected leaf but does not stop there. Check at least one previously clean leaf and one neighboring plant. This tells you whether mites are surviving in the original hotspot or spreading. If one plant repeatedly tests positive while others remain clear, focus controls on that plant and improve access to its hidden leaf surfaces.
Checkpoint Useful evidence Interpretation
First day Stippling pattern, mites on white paper, webbing Establish the baseline and confirm live activity
After mechanical removal Mites visible on undersides Shows whether immediate population reduction occurred
Subsequent checks Live mites on several leaves Indicates remaining activity even if webs look cleaner
Next flush of growth New stippling on expanding leaves Stronger sign of ongoing feeding than older damaged leaves
Neighboring plant inspection Similar dots or confirmed mites Reveals whether isolation and local treatment are sufficient
The table is a way to organize observations; it does not set a universal treatment interval. Follow labels for any pesticide schedule and allow for the plant’s species, growth rate, and environmental conditions.
Mistakes that produce recurring outbreaks
Waiting for thick webs. By that stage injury may already be extensive. Investigate unexplained fine stippling early, especially on a plant with a history of mites.
Treating only the top of the leaf. Many mites feed and shelter underneath, near veins and petioles. A glossy-looking upper surface can hide a live population on the reverse.
Assuming more humidity equals control. Comfortable room humidity can reduce environmental stress for some plants, but humidifiers are not a substitute for mite removal or targeted treatment. Condensation and persistent wet foliage create their own problems.
Using harsh cleaning recipes. Vinegar, bleach, concentrated dish detergent, and homemade solvent mixtures can damage leaves. Plant-safe rinsing or a labeled pest-control product is a more defensible choice.
Changing every growing condition at once. Moving a plant into shade, repotting it, overwatering it, and spraying it repeatedly makes any subsequent decline impossible to interpret. Keep unrelated variables as stable as reasonable.
Stopping after one clean inspection. Eggs or hidden mites may survive, and nearby plants may be lightly affected. Continue targeted observation until the trend is genuinely stable.
A small-apartment example
Imagine a rubber plant on a west-facing windowsill developing a dusty bronze appearance. A white-paper test reveals moving dots on two older leaves. Instead of moving every plant into a bathroom and spraying the room, isolate the rubber plant where it still has adequate light. Photograph the affected leaves, rinse their undersides gently if foliage tolerates it, and inspect the adjacent pothos. Record what you see at subsequent checks. If mites remain active, select an indoor-labeled control according to local guidance.
The important difference is that each step answers a question. The initial test establishes what is present. Isolation defines the immediate risk area. Removal reduces exposed mites. Reinspection tells you whether the control worked and whether another plant is involved. None of these observations depends on a promise that a universal home remedy will fix every infestation.
A different response might be necessary for a velvety-leaved plant prone to water spotting. There, forceful rinsing can damage foliage, so inspection and carefully chosen labeled options take greater importance. Species-specific tolerance should always influence the method.
Distinguish plant recovery from a change in the light
A change in indoor lighting can make old mite injury look strikingly different. Stippled areas may appear almost white against a bright window, then seem barely visible under warm evening lighting. When you compare photographs, use approximately the same angle and exposure. Otherwise, you may mistake a camera effect for new feeding or for healing that has not occurred. Mark two leaves as reference points: one with clear old damage and another that was clean at the start of control.
Inspect the clean leaf on each visit. If newly expanded tissue develops pale speckles and the paper test remains positive, living mites may still be feeding. If no new injury appears and repeated checks show no mites, the persistent appearance of the old leaf is not a reason for more aggressive spraying. This distinction matters particularly for slow-growing ficus and other plants that hold mature leaves for long periods.
An owner’s impulse is often to prune the most visibly damaged leaves immediately. Yet a plant that has lost significant foliage to mites may need its remaining green tissue for energy. Removing the entire damaged canopy can slow recovery. Retain functional leaves unless they are fully dead, heavily infested beyond practical treatment, or a specific pruning decision is justified. New growth is the better measure of the plant’s future.
When another cause resembles stippling
Thrips injury may leave silvery scarring and dark fecal spots; edema, chemical spotting, and mechanical damage can also alter leaf surfaces. Some mineral deficiencies can produce patterned yellowing, but that does not establish a mite population. If a white-paper test is negative repeatedly, inspect with magnification and consider other causes. It is reasonable to ask a local extension service for help rather than applying a third pesticide to a plant on which mites were never confirmed.
Frequently asked questions
Are spider mites insects? No. They are mites, related to spiders, which is one reason insecticide labels must be checked for activity against mites specifically.
Can the leaves recover their green color? Existing stippling normally remains. The useful recovery signal is clean new growth and no continued damage.
Does visible webbing mean the plant is beyond saving? Not necessarily. Evaluate the extent of leaf injury, vigor, and the accessibility of the mite population before deciding.
Do spider mites jump between plants? They do not need to jump to spread; plant contact, movement on infested material, and other routes can transfer them. Physical separation and careful handling help.
Should I cut every damaged leaf off? Usually not. Removing all marked leaves may strip a stressed plant of valuable photosynthetic area. Prune only when foliage is severely damaged or removal serves a clear control purpose.
Keep the response precise
Spider mites reward close observation. Confirm their presence, reduce the population by a method your plant can tolerate, and inspect leaf undersides repeatedly until new feeding stops. A plant with scarred old leaves may still recover into vigorous growth. What matters is whether the living mites and their fresh damage are declining—not whether you can make the evidence of last month’s outbreak disappear overnight.
References
University of Minnesota Extension — Insects on indoor plants
University of Minnesota Extension — Spider mites