African Violet Leaf Cuttings: Rooting and Separating Plantlets
An African violet with healthy leaves can often become several new plants without sacrificing its crown. Unlike a pothos cutting, which uses a piece of stem with a node, an African violet leaf cutting can generate roots and entirely new plantlets from the base of a petiole. Watching that process is rewarding, but it is slow enough that inexperienced growers sometimes disturb the cutting just before the new growth is ready to appear.
The practical method is straightforward: choose a healthy leaf, retain a useful length of petiole, root it in a clean, airy medium, maintain humidity without keeping the medium soggy, and separate the resulting plantlets only when they are substantial enough to manage. The hardest skill is not cutting the leaf. It is knowing when to leave the pot alone.
Why a single leaf can produce several plants
The petiole is the stalk linking the leaf blade to the crown. Under suitable conditions, cells near the petiole base can form roots and new shoots. Several small crowns may eventually develop around one original leaf. Those crowns are separate young plants, not merely new leaves on the original cutting.
That distinction is important when repotting. The original leaf may remain green and useful for months; the plantlets become increasingly independent as they grow roots of their own. If you detach them too soon, small crowns with insufficient roots can dehydrate rapidly. If you wait until their leaves and roots are easier to handle, separation becomes less traumatic.
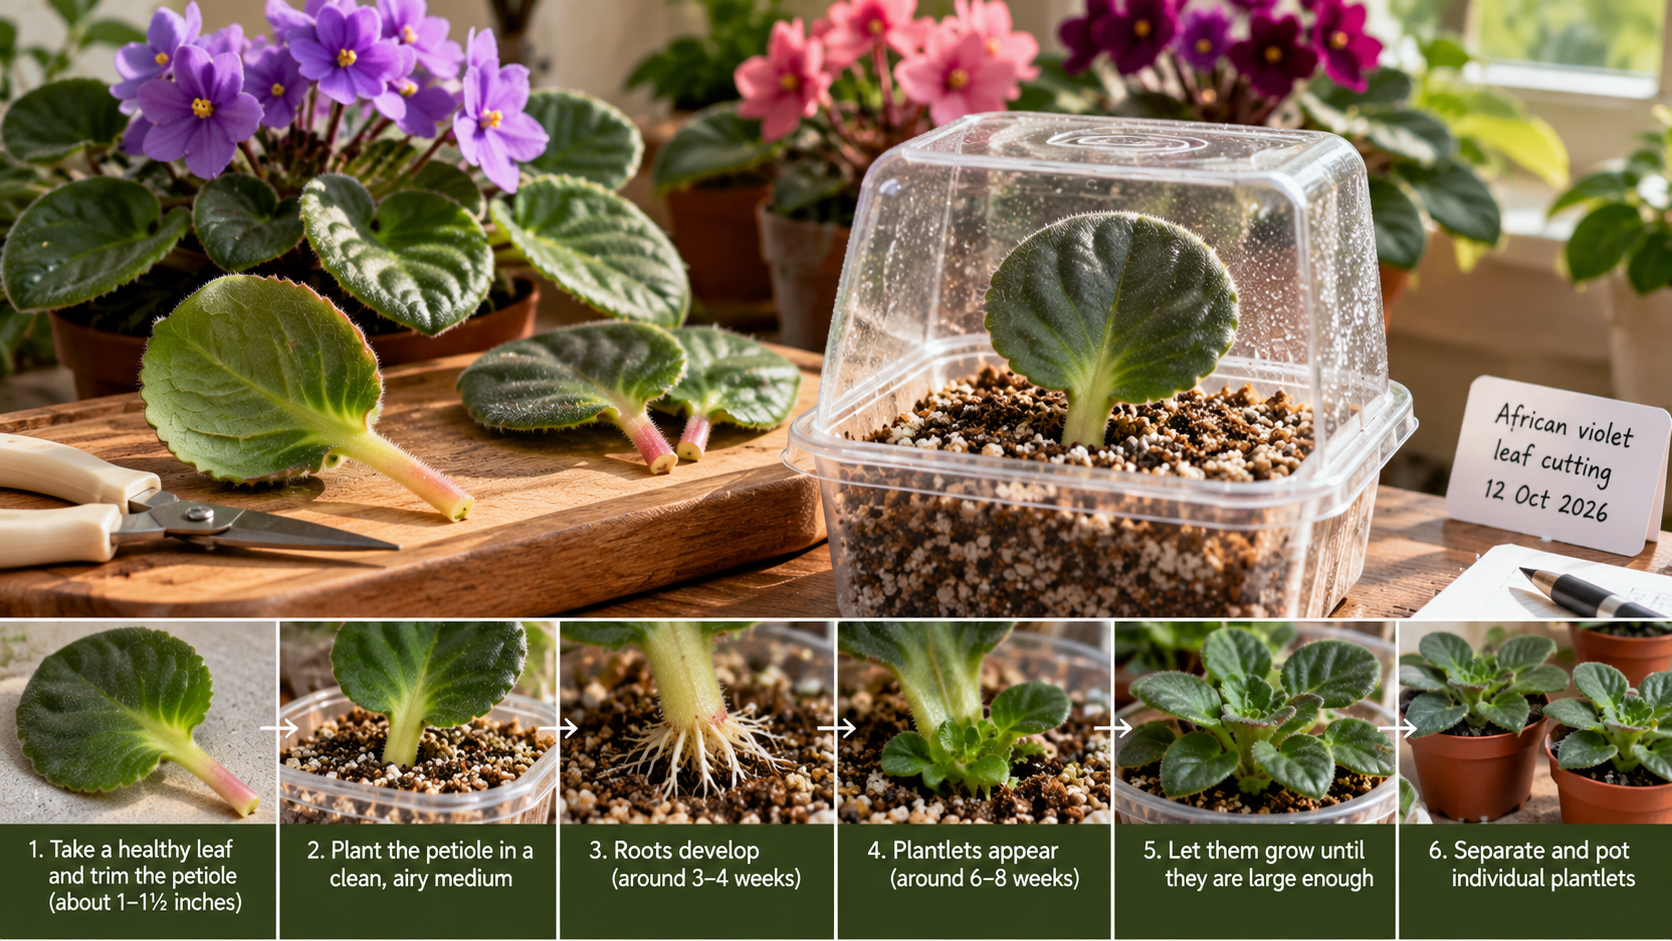
The Iowa State University Extension instructions for African violet leaf cuttings describe retaining approximately 1–1½ inches of petiole and setting it into a moist, well-drained propagation medium. Their guidance gives a typical rooting period of three to four weeks and initial plantlet appearance after roughly six to eight weeks. These are useful expectations, not deadlines: temperature, light, cultivar, leaf maturity, and growing medium influence the actual pace.
Choose the donor leaf carefully
Select a mature but vigorous leaf from a healthy plant. The very oldest outer leaves may be tired or physically damaged; the tiniest leaves in the center are usually less convenient to handle and can weaken the growing crown if removed. A middle-row leaf with firm texture, good color, and no suspicious spots is a practical choice.
Inspect the plant for mealybugs, thrips, mites, and unusual fungal growth before collecting a cutting. Propagation does not automatically remove pests. Starting several cuttings from a plant with an active infestation can spread a problem into a new tray and make early plantlet care more difficult.
Use a clean, sharp blade or scissors. Avoid crushing the petiole with blunt tools or pulling the leaf off so forcefully that you damage the crown. Take the leaf with enough stalk to allow controlled placement in the medium. Make the final trim to the desired length after detaching it, supporting the blade and petiole on a clean work surface.
If the parent plant is a treasured variety, label the cutting immediately. African violet collections can contain several plants that look similar without flowers. A simple label with the cultivar name, cutting date, and parent identification can prevent confusion months later.
Prepare a propagation pot and medium
A small pot or shallow propagation container with drainage is sufficient for one or a few leaves. You do not need a large planter. In fact, a large mass of wet media around a small cutting can remain damp longer than intended. Make sure any reused pot is clean and free of residue from previous diseased plants.
The medium should hold some moisture while allowing air to reach forming roots. Iowa State describes a mixture of coarse sand and vermiculite for African violets, while its broader propagation guidance also discusses perlite and other airy rooting materials. A clean commercial propagation mix formulated for cuttings can be another option. Avoid uncomposted garden soil, compacted media, and standing water in a cover pot.
Moisten the medium before planting. It should feel evenly damp, not drip freely when squeezed. Let extra water drain. A premoistened mix is easier to handle without washing the petiole loose and reduces the temptation to pour a heavy stream of water around a fresh cutting.
Use a pencil to make a hole so the cut end does not scrape against abrasive particles as you insert it. That small step is particularly helpful when the stalk is thin or delicate.
Make the petiole cutting without burying the leaf blade
Trim the petiole to a manageable length—often about 1–1½ inches—using a clean blade. Some growers use an angled cut, but the precise geometry is less important than a clean cut and stable placement. Insert the base into the hole and firm the medium gently around it. The leaf blade itself should sit above the medium rather than being buried in damp material.
A slight planting angle can keep the leaf blade comfortably above the pot edge and provide space for the plantlets near the base. Avoid planting the stalk so deeply that the leaf lies against the wet surface. Conversely, a cutting perched in only a few millimeters of media may wobble whenever the pot moves.
If you root several leaves together, leave room between them for airflow and future plantlets. It can be tempting to fill one container with tightly overlapping leaves to save space, but crowded leaves are harder to inspect and may trap moisture against the blade. A little empty space is worth the convenience later.
Once the cutting is stable, do not repeatedly lift it to check for roots. Fine new roots can break easily. Watching for firm leaf condition and eventual plantlet emergence is usually a better way to follow progress.
Provide humidity without encouraging rot
A clear plastic bag or propagation cover can reduce water loss while the cutting has few or no roots. Ensure the cover does not press tightly against the leaf and expose the pot to bright indirect light rather than hot direct sun. Sun shining through a sealed clear cover can quickly create damaging temperatures even when the room itself feels comfortable.
The cover should maintain a humid environment, not a miniature swamp. Condensation alone does not tell you whether the rooting medium is correctly moist. Check the mix periodically and water modestly if it is becoming too dry; if it remains saturated or the leaf looks mushy, review moisture and ventilation. A small opening or brief ventilation may be needed if condensation is excessive, but make changes gradually.
African violet leaves can become damaged when cold water sits on them or when temperature changes are abrupt. Water the medium rather than pouring water over the leaf blade. Keep the pot away from cold drafts and heating vents. A stable indoor temperature and consistent indirect light are generally more useful than elaborate equipment.
Distinguish root formation from plantlet emergence
The original leaf may remain firm for weeks with little visible change. Root formation usually begins beneath the medium before there is anything to see above it. That invisible phase is where patience matters. Digging around the petiole to see whether it has rooted can damage precisely the young tissue you want to encourage.
After several weeks, small green points may appear at the base of the leaf. They can look like tiny folded leaves or a miniature cluster. Those are the beginnings of plantlets. As they mature, separate rosettes become recognizable, sometimes with more than one crown around the same petiole.
A parent leaf that becomes limp, translucent, or rots at the base may have failed, particularly if the medium stayed very wet. A slightly older leaf that is no longer glossy but remains firm may still support a healthy cutting. Judge the entire situation before discarding it. If the mix smells sour, the base turns mushy, or decay is spreading, remove the failed cutting and clean the container before trying again.
Do not expect every leaf to root or every petiole to generate multiple plants. Propagation is biological, not mechanical. Healthy starting material and stable conditions raise the chances, but even a carefully handled leaf can fail for reasons that are not obvious.
Know when the plantlets are ready to separate
Wait until each new plantlet has several leaves you can distinguish and enough size to handle with your fingertips or a small tool. The precise measurement is less important than the presence of a recognizable crown and developing roots. Very tiny plantlets that cling to the parent petiole can be left together longer.
Before separating, slightly moisten the medium so it will release around fine roots without crumbling into hard clumps or becoming a mud slurry. Lift the group carefully with a small spoon or plant label. Brush away only enough loose media to see how the crowns connect. Pulling sharply on a leaf blade can detach a tiny rosette from its root system.
Identify the individual crowns. Where they part easily, gently tease them apart; where tissue is tightly joined, a clean fine blade may be safer than forceful tearing. Keep any roots with the corresponding plantlet whenever possible. Do not worry if a plantlet is smaller than its neighbor; size differences are common.
If separation would require major damage, repot the group together and revisit it later. One crowded but rooted pot is usually better than several crown fragments that dry out before establishing.
Pot up without burying the growing crown
Use small pots suited to the size of each root system. African violets often do better in comparatively modest containers than in unnecessarily large pots that hold moisture for a long time. A fine, airy potting mix suitable for African violets is preferable to dense outdoor soil.
Position each rosette so the growing crown remains above the medium. Burying the crown too deeply can invite rot and make future inspection difficult. Firm the medium lightly around roots, water gently, and allow excess water to drain. Label each new pot before the plants become interchangeable on the shelf.
A newly separated plantlet has limited roots and may need a short period of higher humidity. Use a loose clear cover if appropriate, but acclimate it gradually to ordinary room conditions. Rapidly removing a long-used humidity dome can expose tender leaves to much drier air; leaving it sealed indefinitely can encourage excessive dampness.
Keep the plantlets in bright indirect light. Do not fertilize heavily just because they are small. Allow root systems to establish and resume normal growth before introducing a modest feeding routine appropriate to the medium and plant.
A realistic propagation timeline
Consider one healthy middle-row leaf planted in spring. During the first week, you are mainly maintaining stable moisture and temperature. For the next several weeks, you may see no movement at the surface. Around a month later the cutting appears stable, but lifting it to check would risk fine roots. New green points become visible later. Over subsequent weeks, perhaps three small rosettes develop at different rates.
You decide not to separate them immediately because the smallest is still delicate. After further growth, two plantlets have several leaves and visible roots. You pot those individually and leave the youngest alongside the parent leaf for a while longer. This is a perfectly successful outcome even though the cuttings did not follow a neat weekly calendar.
A contrasting case helps identify preventable problems. If the propagation pot sits inside a cachepot of standing water and the leaf base becomes translucent, more water is unlikely to rescue it. Improve drainage and use a fresh cutting from a healthy donor rather than repeatedly fertilizing a rotting petiole.
Solve common problems at the right stage
If a cutting wilts soon after planting, check whether the leaf was damaged, the medium has dried completely, the cover is overheating, or the petiole base has begun rotting. The correct action depends on the actual cause. If there is good moisture but a foul smell or soft base, adding humidity is not helpful.
If roots seem likely but no plantlets appear, maintain conditions and give the plant more time, particularly in a cooler room or during a low-light season. Avoid continually moving the container into brighter and hotter locations. If plantlets form but stay tiny, inspect light availability and root-zone moisture before feeding. Fertilizer cannot compensate for an unrooted, waterlogged crown.
If the parent leaf is still healthy after plantlets are removed, some growers leave it to produce more growth. That can be an experiment, but not a guarantee. Prioritize keeping the newly rooted plants healthy rather than extracting every possible plantlet from one original leaf.
Build a small propagation routine
Keep a written record: leaf selected, cutting date, medium, cover type, first observed plantlets, and separation date. Photos at similar intervals reveal progress that is easy to miss while looking at the pot every day. They also help explain differences if you experiment with two clean rooting media or different safe lighting positions.
Maintain clean tools, keep labels readable, and resist overcrowding seedlings and cuttings together. If one cutting develops pests or rot, investigate before moving it into a communal propagation shelf. The convenience of a shared cover should not come at the cost of spreading a preventable problem.
The central technique is gentle restraint. A healthy leaf, clean and airy medium, controlled humidity, bright indirect light, and patient separation can transform one African violet leaf into several plants. The real sign of success is not simply a rooted petiole—it is a set of separate, growing rosettes that survive the move into their own pots.
References
Iowa State University Extension — How can I propagate an African violet?
Iowa State University Extension — How to Propagate Houseplants by Leaf Petiole Cuttings